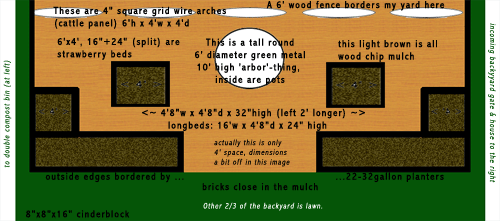
If you can carry bricks and shovel and bend over, or can pay someone who can, it's easy to make. Just drop some heavy-duty landscaper's fabric (it allows water through, but nothing else) at the bottom to prevent weeks etc. growing up through it. Then put some 1/4" steel hardware cloth down to prevent critters from burrowing up underneath it. Then use cinderblocks to create a square, rectangle, etc. a few bricks high. Fill the bottom few inches with large gravel to allow drainage. Then fill it up with topsoil and compost -- or google "Lasagna Gardening" for the best way to layer a deep garden!
We do organic gardening, so we don't use any kind of pest killer.
First we put down black landscape mat. This lets water through, but nothing else. It is not biodegradeable.

Then we put down hardware metal 'cloth', to keep the rodents from burrowing up under it.

Then we put down rock. In the bed shown here, we had a ton of old/broken planter pots around from the landscaping, cheap plastic, and we decided to use those as some spacers, to save on a little soil. The other beds don't have that.

Then when the first beds were done, and the arches were in place against the fence, and the whole area between them had landscape mat and mulch for a nice walkable area in the middle, it was ready to plant.


Since then of course, we added a big round arbor in the middle, and we may put our lovely white birdbath in the middle of this spring... we've added a couple more beds as well.
Notice the white tubes sticking out of the pots. We originally made all the pots rather like the "earthbox" (google it) which is a fabulous way to garden in containers. (If you can't use a drill on those monster plastic-rubber tubs for holes, use a cheap sawdering iron.)
But we have SUCH a mosquito problem in this region, that was a nightmare. All the mosquitos went down the tube, nested VERY happily in the water container at the bottom, and literally... well it was just horrible. It was literally walking into a heavy, thick swarm you couldn't even breathe in and that just attacked you 500 at a time. We cleaned out the rain gutters of the house which were breeding them (the leaves from fall make a sort of cover for water that often sits for quite awhile), we removed the water-layer of the earthbox-type planters and just made them all soil instead.
Now, if you do NOT have a mosquito problem, I recommend the home made earth box approach, especially for summer. If you do, then ANY standing water is a disaster. The "water bottle" approach I mentioned in my last post isn't an issue because the water will not stay in there long enough for them to breed. Funny enough, we have no conscience about killing mosquitos! Anything that eats US is fair game. Bugs that do our species no harm, we have no reason to punish any more than necessary.
This year (2007) we also hope to get some 'toppers' -- flat brick tops that you put on top of cinderblock to make a nice neat flat edge.
.
2 comments:
Read about your "mosquito breeding farm"...why didn't you just cover the top of the fill pipe with window screening held in place with a rubber band, etc.? It would be no trouble to take off to fill the reservoir and then replace the screen.
If gardening had darwin awards, we'd at least get an honorable mention.
We didn't garden last year at all. This year I'm digging out the disaster and planting again. The tubs were made into ordinary soil planters, but since they are now filled with weeds and since the hard freeze cracked all of them, I'm putting their soil in the compost bins and tossing them, and building a few small cinderblock beds between the arches. I'm hoping to set a higher 'tower' for a 5gal pail for water and tubing to feed those beds. This time... I will use screen. Doh!
Post a Comment